
How to make your first N8N AI agent for free
Automations are the order of the day. I’m sure you’ve read thousands of news and used chatgpt. However, there is a way to get the most out of it…. A LOT. Today we are going to teach you how to take your first steps. We’ll show you how to create your first intelligent agent with n8n IA from scratch, completely free, and without complicating your life. If your business receives repetitive questions by email, forms or chat, this tutorial is for you.
We will set up a chatbot that will answer questions about your company, collect customer data when necessary, and also check if they already exist in your database so as not to duplicate them. All this using n8n with Ollama, local AI models, and Docker.
What is n8n? What does it have to do with AI and why can it be useful for my company?
n8n is an open source automation platform (like Zapier or Make) that allows you to connect applications, databases, APIs and, most importantly for us today, artificial intelligence models.
What makes n8n special is that you can create visual workflows by dragging nodes, without having to be a crack programmer. And because it is open source, you have full control over your data.
The 3 ways to use n8n (and which one is the best)
Before we get into the nitty-gritty, let’s explain the options you have for working with n8n:
1. n8n Cloud (the fast option)
The cloud version of n8n. You sign up, pay a monthly subscription and that’s it. Zero installation, zero maintenance. Perfect if you want to get started right away, but it has limitations in the free plan and your data is on third party servers. Problem? maybe the price? 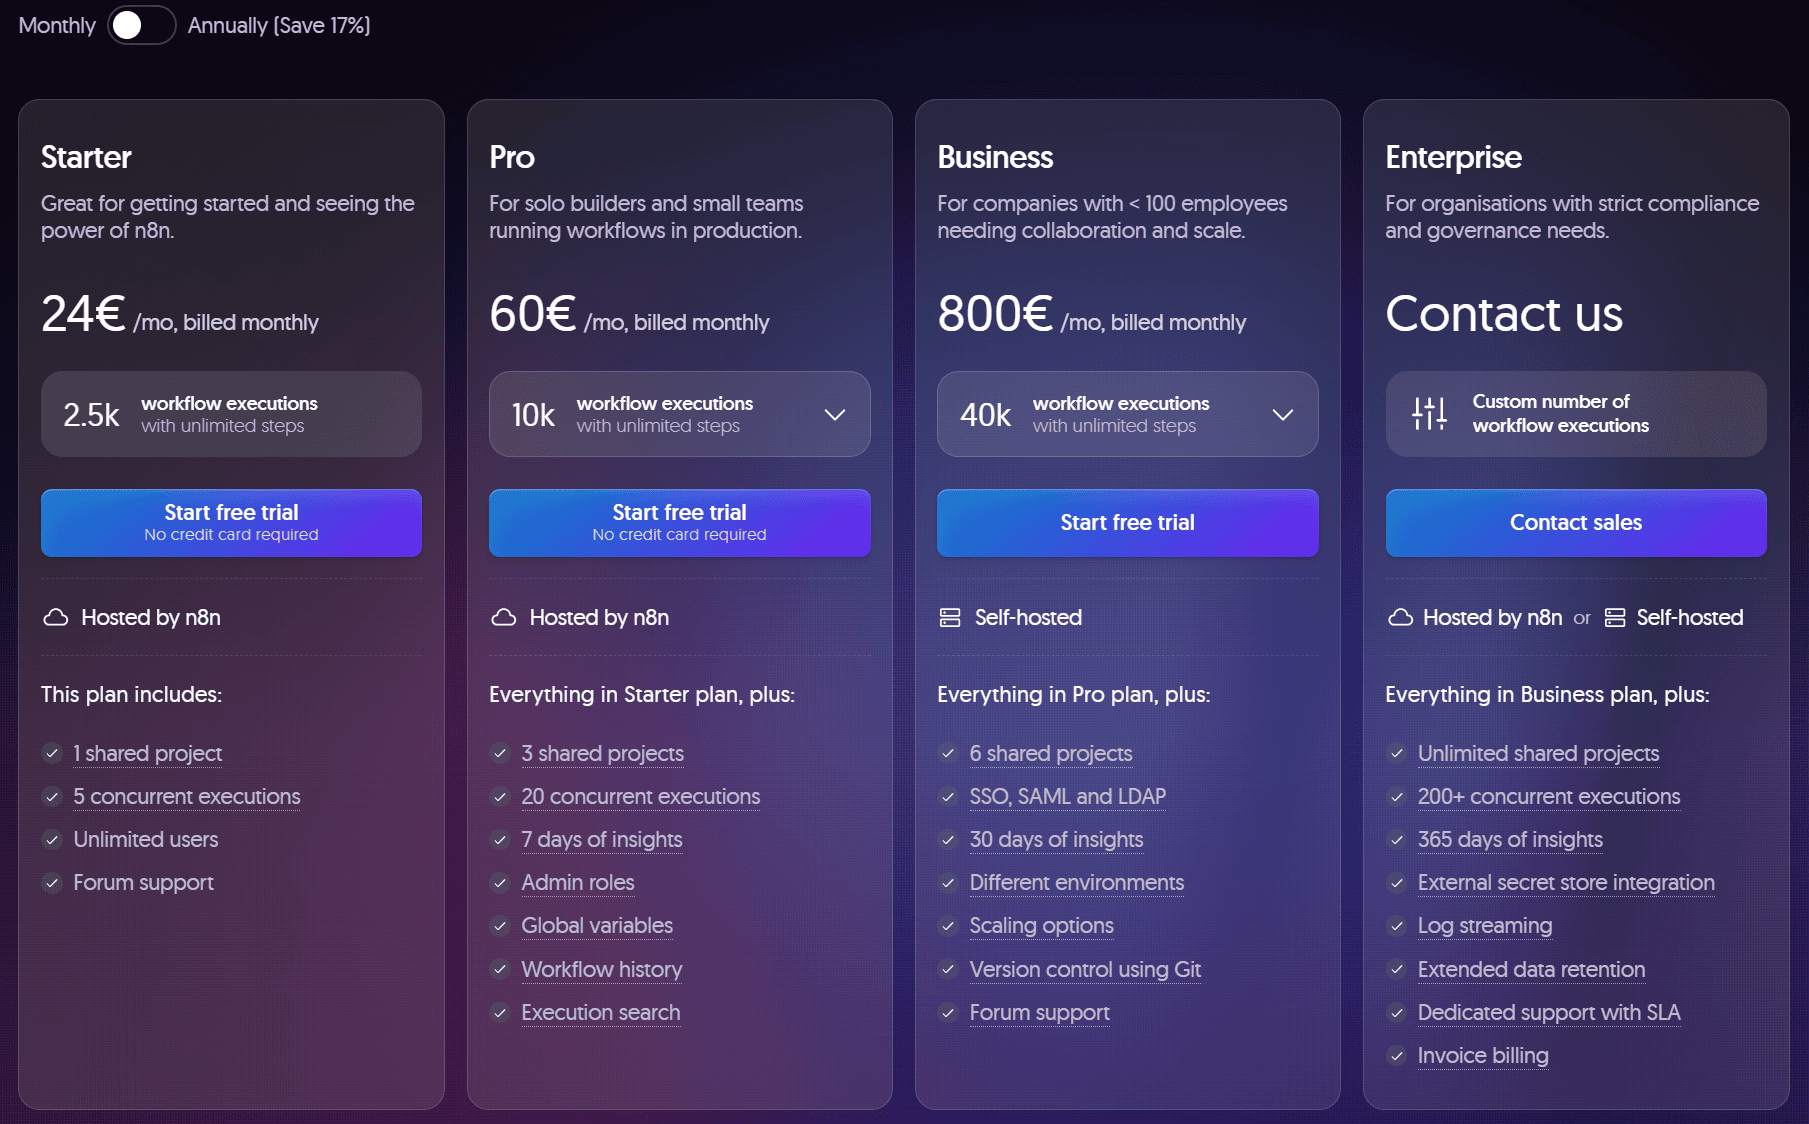
2. Locally on your computer (what we will do today)
You install n8n on your local machine with Docker. It is 100% free, ideal for learning and testing. The problem is that it only works when your computer is on. If you turn it off, no more workflows.
3. VPS with n8n (the most practical and efficient option)
You hire a VPS (virtual private server) and set up n8n there. Your AI agent will be available 24/7, 365 days a year. This is the professional option if you want your business to run without interruptions. It is the option we recommend and we have good news: With the code SIXE you can get a discount on your VPS to have n8n always available. Contact us for more information on how to set it up.
Today we are going to use option 2 (local with Docker) so you can learn without spending a euro. Then, when you see the potential, you can easily migrate to a VPS.
Prerequisites for using n8n locally
Before you start, make sure you have:
- Windows 10/11 (64-bit)
- We recommend at least 8GB of RAM (required to run AI models locally).
- Eager to learn (this is free)
Step 1: Install Docker
Docker Desktop is the easiest way to use Docker on Windows. Download it by
click here
. To verify that you have installed it type docker --version to check that it is ready.
If you see the version, perfect! Docker is ready.
Step 2: Install n8n with Docker Desktop
Now comes the easy part. With a single command you will have n8n up and running.
Steps:
- Open PowerShell
- Execute this command:
docker run -it --rm --name n8n -p 5678:5678 -v n8n_data:/home/node/.n8n n8nio/n8n
What does this command do?
docker runruns a container-itinteractive mode (you will see the logs in real time)--rmdeletes the container when you close it (don’t worry, the data is saved in the volume)--name n8n: name the container “n8n” : name the container “n8n”.-p 5678:5678: map port 5678 (you will access through http://localhost:5678)-v n8n_data:/home/node/.n8nCreate a volume to store your workflows
- Wait 30-60 seconds while downloading the n8n image.
- When you see something like
Editor is now accessible via: http://localhost:5678/, you’ve got it. - Open your browser and go to: http://localhost:5678
- Create your local account:
- Email: the one you want (it’s local, it’s not sent anywhere)
- Password: the one you want
- Name: your name or your business name
We already have everything available to use n8n! For any doubt, we recommend you to follow the official n8n tutorial (click here to see it). If you are going to use Ollama, as in our case, we recommend you to use the official pack that includes Ollama so you have everything in the same environment. Click here for n8n + ollama.
Step 3: Install Ollama (your local AI model)
To use n8n AI we need a language model. We are going to use Ollama, which runs AI models directly on your computer, for free and without limits. That is, you can use your computer’s resources to run AI models.
Install Ollama on Windows:
- Download Ollama by clicking here (official)
- Install Ollama
- Verify the installation:
- Open PowerShell
- Write:
ollama --version - You should see the installed version
Download the recommended template:
We are going to use Qwen2.5:1.5b, a small but powerful model, perfect for enterprise chatbots. It is fast and does not need a supercomputer. However, from here you can find thousands of models to use.
In the shell, run:
ollama pull qwen2.5:1.5b
Verify that it works:
ollama run qwen2.5:1.5b
If you get an interactive prompt where you can type, it works. Type /bye to exit.
You must take into account one very important thing: Agents depending on their AI model will be able to use tools or not. You can use other models such as
- Ollama Models – Recommended:
llama3.2:3b,mistral:7b,phi3:mini - Compatible Hugging Face models
The larger the model, the better the responses but the more RAM you need. This translates into response time.
Step 4: Configure Ollama for n8n
Here comes a critical step. Docker Desktop on Windows has a little network “problem” that we need to fix. Ollama is running on your Windows, but n8n is inside a Docker container. They need to talk to each other.
The solution:
- Stop n8n if you have it running (Ctrl + C in PowerShell)
- Restart n8n with this command:
docker run -it --rm --name n8n -p 5678:5678 --add-host=host.docker.internal:host-gateway -v n8n_data:/home/node/.n8n n8nio/n8n
The parameter --add-host=host.docker.internal:host-gateway allows n8n to access Ollama.
- Make a note of this URL because you will need it:
http://host.docker.internal:11434
This is the address you will use to connect n8n to Ollama.
Step 5: Create your first agent in n8n
How’s it going? Let’s start having some fun. Let’s create a chatbot that:
- Answer questions about your business using information from a document.
- Collect data from interested customers
- Check if the client already exists before saving it
- Alert your team when someone needs human attention
Import the base workflow:
At SIXE we like to make things easy for you. Instead of creating everything from scratch, we will give you a template and customize it for you.
- In n8n, click on “Workflows” (top menu).
- Click on the “+ Add workflow” button and select “Import from File”.
- Download here the ia tutorial template with n8n from SIXE.
- Import the file into n8n (in the workflow, there is an extra icon, click and import from file).
Configure the AI model (Ollama):
- In the workflow, drag a new node from the left pane
- Search for “Ollama Chat Model” and add it to the canvas
- Click on the Ollama node to configure it:
- Base URL:
http://host.docker.internal:11434 - Model:
qwen2.5:1.5b - Temperature:
0.7(controls creativity: 0 = very precise, 1 = very creative)
- Base URL:
- Connects the Ollama node to the “AI Agent” node:
- Drag from the (bottom) point of Ollama node
- Up to the point of the AI Agent node
- This tells the agent to use Ollama as a brain.
Customize the agent prompt:
The prompt is the personality of your chatbot. Here you tell it what it does, how it talks and what information it has.
- Click on the node “AI Agent”.
- In “System Message”, copy this prompt and customize it:
Eres el asistente virtual oficial de "[TU EMPRESA]".

Tu función es ayudar a los usuarios que escriben al chatbot de la web, ofreciendo respuestas claras, útiles y verídicas.

? Reglas principales:
- Nunca inventes información
- Si no sabes algo, admítelo y ofrece derivar al equipo humano
- Sé profesional pero cercano

? Información sobre [TU EMPRESA]:
[Aquí describe tu negocio: qué hacéis, servicios, precios, horarios, etc.]

Ejemplo:
"Somos una agencia de automatización que ayuda a empresas a ahorrar tiempo usando herramientas como n8n, Airtable y Make. Nuestros servicios incluyen:
- Consultoría inicial (gratis)
- Implementación de automatizaciones (desde 500€)
- Formación para equipos (200€/persona)
Horario: L-V de 9h a 18h"

? Si detectas interés en contratar:
Pregunta educadamente:
- Nombre
- Email
- Teléfono (opcional)
- Qué necesita específicamente

Una vez tengas estos datos, los guardarás automáticamente.

? Si no puedes ayudar:
Ofrece derivar al equipo humano y contacto por WhatsApp.
Add memory to the chatbot:
For the chatbot to remember the conversation (not repeat questions), it needs memory.
- Click on the node “AI Agent”.
- Look for the “Memory” section in the agent options.
- Add a memory node (simple memory that remembers the last messages, with 5, which is the default number of messages, should be enough).
You already have a functional chatbot. But let’s add more spice to it.
Step 6: Add knowledge and tools to the agent
The tools are like apps that the agent can use when he needs them. Let’s add the essential ones. To start creating, click on add tool to the agent.
Tool 1: Google Docs (knowledge base)
Instead of putting all the info in the prompt (which has a limit), we will use a Google Doc as a knowledge base.
- Create a Google Doc with as much information as possible about your business
Pregunta: ¿Cuánto cuestan vuestros servicios?
Respuesta: Nuestro servicio básico cuesta X€, el premium Y€...

Pregunta: ¿Cuánto tarda un proyecto?
Respuesta: Entre 2-4 semanas dependiendo de la complejidad...

[Añade todas las preguntas frecuentes, horario, contacto etc]
- In n8n, drag the node “Google Docs Tool”.
- Connect your Google Account. This step is a bit heavy if you are inexperienced but we promise to guide you in the easiest way possible.
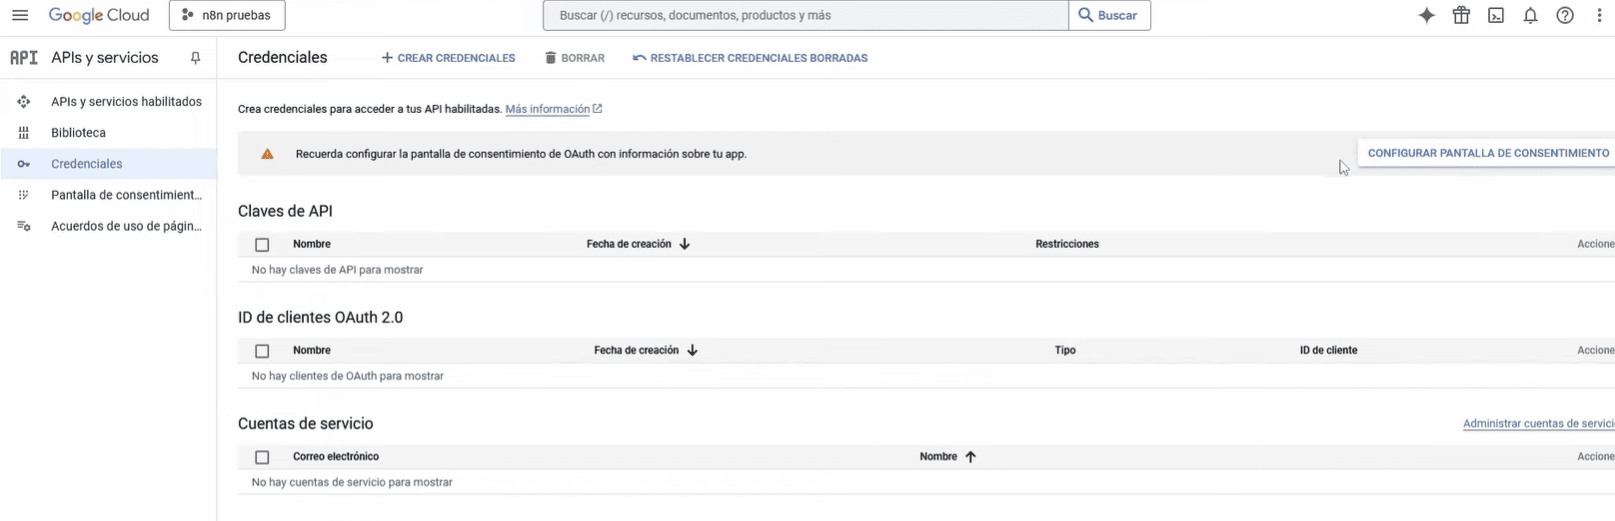
- Sign in to Google Cloud Console
- Create a project if you do not have one
- Go to APIs and services and under credentials configure the consent screen.

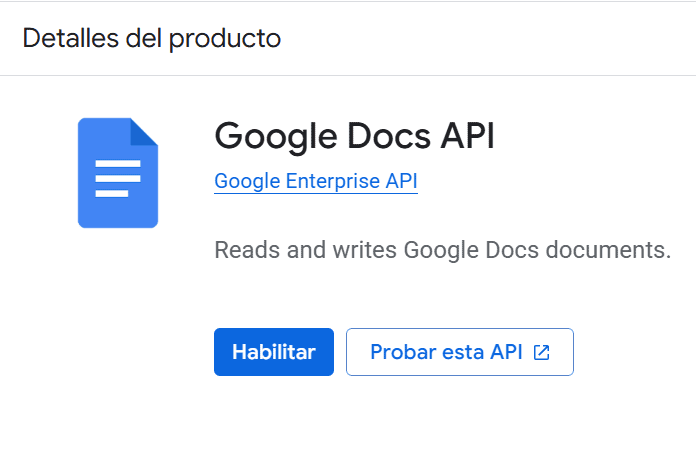
- Once that is done, add the google service you need. In our case, google docs.

- We go back to APIs/credentials and create an OAuth client. There the most important thing is to give permissions and in “URL of authorized redirects” we will put the URL that n8n gives us.

- We copy the client ID and the secret and put them in n8n.
- Select the document you created
- Connect the node to the AI Agent

Now the chatbot can consult that document when someone asks a question. Remember that it is important to tell the agent when to use each tool in “System Message” in the agent configuration.
Tool 2: Search contact (Airtable)
Before saving a customer, you have to see if it already exists. We will use Airtable as a simple CRM. Create a new tool and attach it to the agent.
Preparation in Airtable:
- Create a free account on airtable.com
- Create a new Base called “CRM”.
- Create a “Contacts” table with these columns:
- Name (text)
- Email (email)
- Telephone (phone)
- Date of contact (date)
In n8n:
- Drag the node “Airtable Tool”.
- Configure:
- Operation: “Search”.
- Base: [your CRM base].
- Table: Contacts
- Activate “From AI” in Filter Formula
This allows the agent to search if an email already exists.
Tool 3: Save/Update contact (Airtable)
If the contact does not exist, we save it. If it does exist, we update it only if there is new data. Again, we add a new tool.
- Drag another node “Airtable Tool”.
- Configure:
- Operation: “Create or Update” (Upsert)
- Base: [your CRM base].
- Table: Contacts
- Matching Column: Email
- Activate “From AI” in all the fields.
The agent can now automatically save contacts without duplicating them.
Tool 4: Notify the team via Slack or Telegram.
When someone needs human attention, the chatbot can alert via Slack/Telegram.
- Drag the “Slack Tool” node (or Telegram if you prefer).
- Connect your Slack account
- Select the channel where you want the notifications
- At the agent’s prompt, he adds:
Si el usuario pide hablar con una persona o su caso es complejo, usa la herramienta de Slack para avisar al equipo con:
- Nombre del usuario
- Email o teléfono
- Resumen breve del problema
Step 7: Activate and test the chatbot
Everything is ready! It’s time to test.
- Try the chatbot:
- Click on “Test workflow”.
- Write: “Hello, what services do you offer?”
- Check how it responds using the Google Doc info.
- Try saving a contact:
- Write: “I’m interested, I’m Juan Perez, my email is juan@ejemplo.com”.
- The chatbot should save the contact in Airtable
- Check it on your Airtable table
- Try a duplicate:
- He writes: “I’m John Smith again, my phone is 666777888”.
- The chatbot should update the existing record, not create a new one.
Step 8: Integrate into your website
The chatbot is already working, but it is in localhost. To use it on your website you need two things:
Option A: Migrate to VPS (recommended)
As you know, we work with Krystal, which offers custom VPS and they are committed to the environment :) You can also take advantage of a discount with the code “SIXE”. With a VPS your chatbot will be available 24/7. n8n offers the option to embed on your website, so it’s perfect.
If you want to learn how to do it with instructors, set it up correctly with HTTPS, custom domain and everything ready for production… We offer a basic course and an advanced course in n8n.
Option B: Use ngrok (temporary, for testing only)
If you want to try ngrok already on your website without VPS:
- Download ngrok: https://ngrok.com/download
ngrok http 5678
- Copy the URL it gives you (type
https://xyz.ngrok.io) - Use that URL instead of localhost in your website
Important: The ngrok URL changes every time you restart it. It is not for production.
n8n stands for freedom with AI
And that’s it. You have your first n8n IA agent running locally with Ollama. In production we recommend OpenAI, especially gpt-4o-mini thanks to its price and good performance. Now it’s your turn to experiment. Try other models, adjust prompts, add more tools.
Doubts? Want us to train you or your team to set up n8n and AI agents in production? Write to us.
And if you enjoyed the article, share it with others who are looking to automate with AI without spending a lot of money.
Additional resources:


